Website feedback and review rounds
Add a feedback widget to a site so clients can pin comments on the page, triage feedback into tasks, and group it into review rounds ending in sign-off.
Website feedback lets clients point at things on their site ("this button's the wrong colour", "typo here") instead of sending long emails. Each piece of feedback carries a screenshot, the page, the element they clicked and technical details (browser, screen size, console errors). You accept it into a task, and the client follows its progress.
Add a widget to a site
- Open the project and its Feedback view (under More), then Add widget.
- Give it a name and the site URL (staging or live; the URL can't be changed later).
- Choose the brand colour and button position, and whether anyone on the site can send feedback (guests). With guests off, only clients who open the site from their portal, and your team, can send feedback; guests are asked for their name and email.
- Choose Install and pick how:
- Any site: paste one line before
</body>on every page, or in your tag manager. - Next.js: a small component for the App Router (off on production by default).
- React: a component for any other React app.
- WordPress: sites connected with the OpsDash Connector plugin (1.2.0 or later) get the widget automatically. Switch it off, or set it to staging only, on the site's page in Site health.
- Any site: paste one line before
Colours, position and who can send feedback are set in OpsDash, so the snippet never needs changing. Replace key if you need to: the old snippet stops working (WordPress sites update themselves).
How clients leave feedback
Clients open the site from their portal with Leave feedback on the site, so the widget knows who they are and shows their own pins. They click the widget's button, then the spot on the page, and write what's wrong. Feedback you hear about by call, email or message can be added with Log feedback (paste a screenshot with Ctrl+V).
Triage
Feedback in the sidebar is the inbox for every site, grouped as Needs triage, Being worked on, Reopened (the client says it isn't fixed), Waiting on client (fixed, waiting for them to check) and Done. Filter by project, round, priority and source.
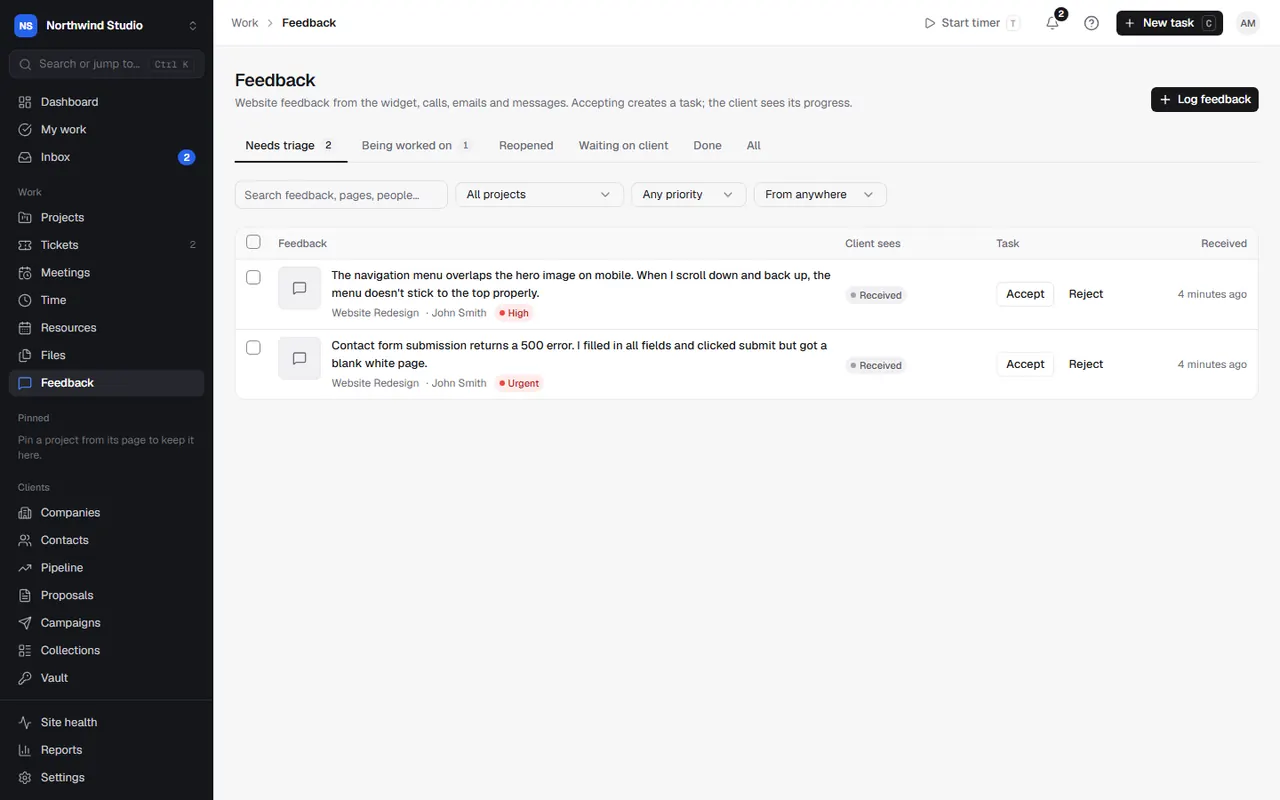
For each item:
- Accept: optionally create a task with the screenshot and files attached, choosing its column, priority, assignee and round. The client sees "Received", then their status follows the task: being worked on, fixed please check, confirmed.
- Reject: the client sees "Closed", with your note sent as a reply.
Select several to accept (with or without tasks), reject, prioritise or move them to a round together. The conversation on each item is visible to the client; their replies also go in the task's comments.
Review rounds
Group a build's feedback into rounds, each ending with the client's sign-off:
- On the project's Feedback view, choose Start a round. Give it a name, a due date and a summary the client sees. Optionally tick Signing off completes milestone (a payment-schedule stage waiting on that milestone is then drafted as an invoice).
- Move feedback into the round as it comes in.
- When it's done, Send for sign-off. It appears in the client's Waiting on you list, and they Confirm sign-off in the portal.
- If they signed off by email or on a call, use Record a sign-off instead.
Take back (not ready) withdraws a round sent too early.
Status emails to clients
In Settings › Website feedback, switch on Email clients about their feedback to tell them when their feedback is being worked on, or fixed and ready to check. Off by default.
Settings in OpsDash
These open in OpsDash. You’ll be asked to sign in first if you aren’t already.
Related articles
- Boards, lists and other project viewsWork in a board or a list, group and filter tasks, save views, and use the timeline, workload, files and financials.
- Leaving feedback on your websitePoint at things on your website to report them, follow each item's progress, confirm fixes, and sign off review rounds.
- What the WordPress connector doesCheck-ins and wake-ups, what the plugin reports, how it updates sites one at a time, the feedback widget, one-click login, MailPoet and self-updates.